통합 테스트
출처 URL: https://docs.prisma.io/docs/orm/prisma-client/testing/integration-testing
통합 테스트
섹션 제목: “통합 테스트”Prisma와 Docker로 통합 테스트를 설정하고 실행하는 방법을 알아보세요.
통합 테스트는 프로그램의 분리된 부분들이 함께 어떻게 동작하는지 테스트하는 데 초점을 둡니다. 데이터베이스를 사용하는 애플리케이션 맥락에서 통합 테스트는 일반적으로 데이터베이스가 사용 가능해야 하며, 테스트하려는 시나리오에 적합한 데이터를 포함해야 합니다.
실제 환경을 시뮬레이션하는 한 가지 방법은 Docker를 사용해 데이터베이스와 일부 테스트 데이터를 캡슐화하는 것입니다. 이는 테스트와 함께 실행 및 종료할 수 있어 프로덕션 데이터베이스와 분리된 격리 환경으로 동작합니다.
참고: 이 블로그 글은 실제 데이터베이스를 대상으로 통합 테스트 환경을 설정하고 통합 테스트를 작성하는 방법을 종합적으로 안내하며, 이 주제를 더 깊이 탐구하려는 분들에게 유용한 인사이트를 제공합니다.
사전 요구 사항
섹션 제목: “사전 요구 사항”이 가이드는 로컬 머신에 Docker와 Docker Compose가 설치되어 있고, 프로젝트에 Jest 설정이 되어 있다고 가정합니다.
최소 버전 요구 사항은 시스템 요구 사항을 참고하세요.
이 가이드 전반에서는 다음 전자상거래 스키마를 사용합니다. 이는 문서의 다른 부분에서 사용하는 전통적인 User, Post 모델과는 다릅니다. 주된 이유는 보통 블로그를 대상으로 통합 테스트를 실행하지 않기 때문입니다.
전자상거래 스키마
schema.prisma
    // Can have 1 customer    // Can have many order details    model CustomerOrder {      id           Int            @id @default(autoincrement())      createdAt    DateTime       @default(now())      customer     Customer       @relation(fields: [customerId], references: [id])      customerId   Int      orderDetails OrderDetails[]    }
    // Can have 1 order    // Can have many products    model OrderDetails {      id        Int           @id @default(autoincrement())      products  Product       @relation(fields: [productId], references: [id])      productId Int      order     CustomerOrder @relation(fields: [orderId], references: [id])      orderId   Int      total     Decimal      quantity  Int    }
    // Can have many order details    // Can have 1 category    model Product {      id           Int            @id @default(autoincrement())      name         String      description  String      price        Decimal      sku          Int      orderDetails OrderDetails[]      category     Category       @relation(fields: [categoryId], references: [id])      categoryId   Int    }
    // Can have many products    model Category {      id       Int       @id @default(autoincrement())      name     String      products Product[]    }
    // Can have many orders    model Customer {      id      Int             @id @default(autoincrement())      email   String          @unique      address String?      name    String?      orders  CustomerOrder[]    }
이 가이드는 Prisma Client 설정에 싱글톤 패턴을 사용합니다. 설정 방법은 singleton 문서를 참고하세요.
프로젝트에 Docker 추가하기
섹션 제목: “프로젝트에 Docker 추가하기”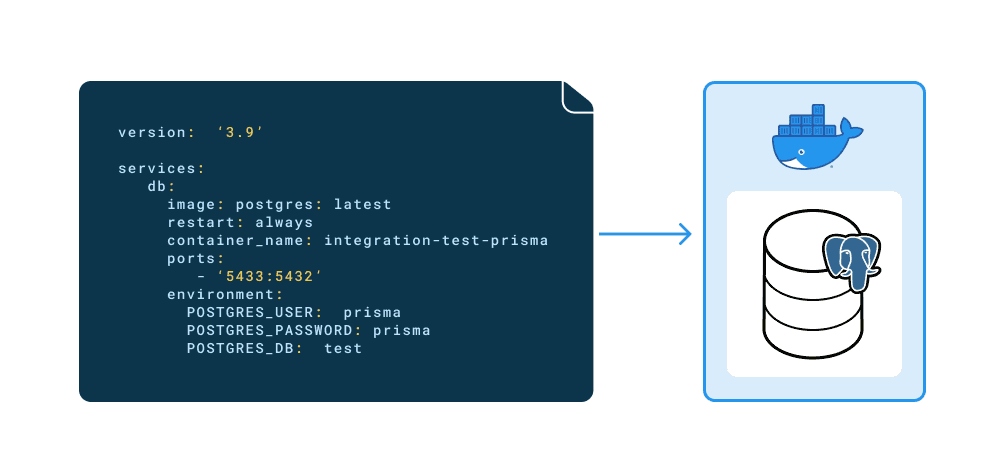
머신에 Docker와 Docker compose가 모두 설치되어 있으면 프로젝트에서 이를 사용할 수 있습니다.
- 먼저 프로젝트 루트에
docker-compose.yml파일을 생성합니다. 여기에서 Postgres 이미지와 환경 자격 증명을 지정합니다.
docker-compose.yml
    # Set the version of docker compose to use    version: "3.9"
    # The containers that compose the project    services:      db:        image: postgres:13        restart: always        container_name: integration-tests-prisma        ports:          - "5433:5432"        environment:          POSTGRES_USER: prisma          POSTGRES_PASSWORD: prisma          POSTGRES_DB: tests
참고 : 여기서 사용한 compose 버전(
3.9)은 작성 시점 기준 최신 버전입니다. 동일한 버전을 사용해 일관성을 유지하세요.
docker-compose.yml 파일은 다음을 정의합니다.
- Postgres 이미지(
postgres)와 버전 태그(:13). 로컬에 없다면 다운로드됩니다. - 포트
5433을 내부(Postgres 기본값) 포트5432에 매핑합니다. 이 포트 번호로 데이터베이스가 외부에 노출됩니다. - 데이터베이스 사용자 자격 증명을 설정하고 데이터베이스 이름을 지정합니다.
- 컨테이너 안의 데이터베이스에 연결하려면
docker-compose.yml파일에 정의한 자격 증명으로 새 연결 문자열을 만듭니다. 예:
.env.test
DATABASE_URL="postgresql://prisma:prisma@localhost:5433/tests"위 .env.test 파일은 여러 .env 파일을 사용하는 설정의 일부입니다. 여러 .env 파일로 프로젝트를 설정하는 방법은 using multiple .env files. 섹션을 참고하세요.
- 터미널 탭을 계속 사용할 수 있도록 분리(detached) 상태로 컨테이너를 생성하려면 다음 명령어를 실행합니다.
docker compose up -d- 다음으로 컨테이너 내부에서
psql명령어를 실행해 데이터베이스가 생성되었는지 확인할 수 있습니다. 컨테이너 id를 기록해 두세요.
docker psCONTAINER ID IMAGE COMMAND CREATED STATUS PORTS NAMES 1322e42d833f postgres:13 "docker-entrypoint.s…" 2 seconds ago Up 1 second 0.0.0.0:5433->5432/tcp integration-tests-prisma참고 : 컨테이너 id는 각 컨테이너마다 고유하므로, 표시되는 id는 서로 다릅니다.
- 이전 단계의 컨테이너 id를 사용해 컨테이너에서
psql을 실행하고, 생성한 사용자로 로그인한 뒤 데이터베이스가 생성되었는지 확인합니다.
docker exec -it 1322e42d833f psql -U prisma teststests=# \l List of databases Name | Owner | Encoding | Collate | Ctype | Access privileges
postgres | prisma | UTF8 | en_US.utf8 | en_US.utf8 | template0 | prisma | UTF8 | en_US.utf8 | en_US.utf8 | =c/prisma + | | | | | prisma=CTc/prisma template1 | prisma | UTF8 | en_US.utf8 | en_US.utf8 | =c/prisma + | | | | | prisma=CTc/prisma tests | prisma | UTF8 | en_US.utf8 | en_US.utf8 | (4 rows)통합 테스트
섹션 제목: “통합 테스트”통합 테스트는 프로덕션이나 개발 환경이 아닌 전용 테스트 환경의 데이터베이스를 대상으로 실행됩니다.
- 작업 흐름
테스트 실행 흐름은 다음과 같습니다.
- 컨테이너 시작 및 데이터베이스 생성
- 스키마 마이그레이션
- 테스트 실행
- 컨테이너 제거
각 테스트 스위트는 모든 테스트를 실행하기 전에 데이터베이스를 시드합니다. 스위트 내 모든 테스트가 끝나면 모든 테이블의 데이터를 삭제하고 연결을 종료합니다.
- 테스트할 함수
테스트 대상 전자상거래 애플리케이션에는 주문을 생성하는 함수가 있습니다. 이 함수는 다음을 수행합니다.
- 주문을 하는 고객 정보 입력을 받음
- 주문할 상품 정보 입력을 받음
- 고객의 기존 계정 존재 여부 확인
- 상품 재고 여부 확인
- 상품이 존재하지 않으면 “Out of stock” 메시지 반환
- 데이터베이스에 고객이 없으면 계정 생성
- 주문 생성
이러한 함수의 예시는 아래와 같습니다.
create-order.ts
    import prisma from "../client";
    export interface Customer {      id?: number;      name?: string;      email: string;      address?: string;    }
    export interface OrderInput {      customer: Customer;      productId: number;      quantity: number;    }
    /**     * Creates an order with customer.     * @param input The order parameters     */    export async function createOrder(input: OrderInput) {      const { productId, quantity, customer } = input;      const { name, email, address } = customer;
      // Get the product      const product = await prisma.product.findUnique({        where: {          id: productId,        },      });
      // If the product is null its out of stock, return error.      if (!product) return new Error("Out of stock");
// If the customer is new then create the record, otherwise connect via their unique email await prisma.customerOrder.create({ data: { customer: { connectOrCreate: { create: { name, email, address, }, where: { email, }, }, }, orderDetails: { create: { total: product.price, quantity, products: { connect: { id: product.id, }, }, }, }, }, }); }- 테스트 스위트
다음 테스트는 createOrder 함수가 의도대로 동작하는지 확인합니다. 테스트 항목:
- 신규 고객으로 새 주문 생성
- 기존 고객으로 주문 생성
- 상품이 없을 경우 “Out of stock” 오류 메시지 표시
테스트 스위트 실행 전에 데이터베이스를 데이터로 시드합니다. 테스트 스위트가 끝난 뒤에는 deleteMany를 사용해 데이터베이스 데이터를 비웁니다.
deleteMany 사용은 스키마 구조를 미리 알고 있는 경우에는 충분할 수 있습니다. 모델 관계가 설정된 방식에 따라 작업을 올바른 순서로 실행해야 하기 때문입니다.
하지만 이는 모델을 순회하며 truncate를 수행하는 더 일반적인 솔루션만큼 확장성이 좋지 않습니다. 해당 시나리오와 raw SQL 쿼리 예시는 Deleting all data with raw SQL / TRUNCATE를 참고하세요.
tests/create-order.ts
    import prisma from "../src/client";    import { createOrder, Customer, OrderInput } from "../src/functions/index";
    beforeAll(async () => {      // create product categories      await prisma.category.createMany({        data: [{ name: "Wand" }, { name: "Broomstick" }],      });
      console.log("✨ 2 categories successfully created!");
      // create products      await prisma.product.createMany({        data: [          {            name: 'Holly, 11", phoenix feather',            description: "Harry Potters wand",            price: 100,            sku: 1,            categoryId: 1,          },          {            name: "Nimbus 2000",            description: "Harry Potters broom",            price: 500,            sku: 2,            categoryId: 2,          },        ],      });
      console.log("✨ 2 products successfully created!");
      // create the customer      await prisma.customer.create({        data: {          name: "Harry Potter",          email: "harry@hogwarts.io",          address: "4 Privet Drive",        },      });
      console.log("✨ 1 customer successfully created!");    });
    afterAll(async () => {      const deleteOrderDetails = prisma.orderDetails.deleteMany();      const deleteProduct = prisma.product.deleteMany();      const deleteCategory = prisma.category.deleteMany();      const deleteCustomerOrder = prisma.customerOrder.deleteMany();      const deleteCustomer = prisma.customer.deleteMany();
      await prisma.$transaction([        deleteOrderDetails,        deleteProduct,        deleteCategory,        deleteCustomerOrder,        deleteCustomer,      ]);
      await prisma.$disconnect();    });
    it("should create 1 new customer with 1 order", async () => {      // The new customers details      const customer: Customer = {        id: 2,        name: "Hermione Granger",        email: "hermione@hogwarts.io",        address: "2 Hampstead Heath",      };      // The new orders details      const order: OrderInput = {        customer,        productId: 1,        quantity: 1,      };
      // Create the order and customer      await createOrder(order);
      // Check if the new customer was created by filtering on unique email field      const newCustomer = await prisma.customer.findUnique({        where: {          email: customer.email,        },      });
      // Check if the new order was created by filtering on unique email field of the customer      const newOrder = await prisma.customerOrder.findFirst({        where: {          customer: {            email: customer.email,          },        },      });
      // Expect the new customer to have been created and match the input      expect(newCustomer).toEqual(customer);      // Expect the new order to have been created and contain the new customer      expect(newOrder).toHaveProperty("customerId", 2);    });
    it("should create 1 order with an existing customer", async () => {      // The existing customers email      const customer: Customer = {        email: "harry@hogwarts.io",      };      // The new orders details      const order: OrderInput = {        customer,        productId: 1,        quantity: 1,      };
      // Create the order and connect the existing customer      await createOrder(order);
      // Check if the new order was created by filtering on unique email field of the customer      const newOrder = await prisma.customerOrder.findFirst({        where: {          customer: {            email: customer.email,          },        },      });
      // Expect the new order to have been created and contain the existing customer with an id of 1 (Harry Potter from the seed script)      expect(newOrder).toHaveProperty("customerId", 1);    });
    it("should show 'Out of stock' message if productId doesn't exit", async () => {      // The existing customers email      const customer: Customer = {        email: "harry@hogwarts.io",      };      // The new orders details      const order: OrderInput = {        customer,        productId: 3,        quantity: 1,      };
      // The productId supplied doesn't exit so the function should return an "Out of stock" message      await expect(createOrder(order)).resolves.toEqual(new Error("Out of stock"));    });
테스트 실행
섹션 제목: “테스트 실행”이 설정은 실제 환경 시나리오를 격리하여, 통제된 환경에서 실제 데이터를 대상으로 애플리케이션 기능을 테스트할 수 있게 해줍니다.
프로젝트의 package.json 파일에 데이터베이스를 설정하고 테스트를 실행하는 스크립트를 추가한 뒤, 이후 컨테이너를 수동으로 제거할 수 있습니다.
테스트가 동작하지 않는다면, 이 블로그에서 설명한 것처럼 테스트 데이터베이스가 올바르게 설정되어 준비되었는지 확인해야 합니다.
package.json
"scripts": { "docker:up": "docker compose up -d", "docker:down": "docker compose down", "test": "yarn docker:up && yarn prisma migrate deploy && jest -i" },test 스크립트는 다음을 수행합니다.
docker compose up -d를 실행해 Postgres 이미지와 데이터베이스가 포함된 컨테이너를 생성합니다../prisma/migrations/디렉터리의 마이그레이션을 데이터베이스에 적용합니다. 이를 통해 컨테이너의 데이터베이스에 테이블이 생성됩니다.- 테스트를 실행합니다.
준비가 되면 yarn docker:down을 실행해 컨테이너, 해당 데이터베이스, 그리고 모든 테스트 데이터를 제거할 수 있습니다.